Convert your handwriting to a font
This service will convert your handwriting into a 'true type' font that can be installed in your computer and used like a regular font. You can also choose to include your signature in this process so it can easily be inserted into any document. This font can be used in any application as long as you can install 'true type' fonts in your operating system. We can assure you that this font will work in MS Windows, but we have not tested it in other operating systems.
1. Print template
Print this PDF template.
2. Complete template
Use a suitable pen such as a black permanent marker of fine or medium thickness to draw the characters the way that you normally write. The pen should not be too thin or too thick. The pen should produce solid consistent black lines without any variation in shade. Make sure you draw your characters within the designated cells as explained below. Only characters that are written down on the template are added to your font set; therefore any characters you skip in the templates will not be included in your font set. We recommend that you fill in all the characters.
Additional charges will apply if you skip a character in the template and you want that character added later. You will also be charged extra if you request any of your characters to be modified after we've started the work; such as changing the size or vertical/horizontal positioning.
All cells, except the signature cell, contain horizontal guidelines (little marks on both the left and right side of each cell) that should help you write your characters in a consistent size and position in each cell. The first row in the image below illustrates the best results while the second row shows you what to avoid.
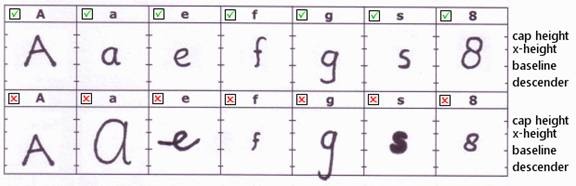
3. Guidelines inside the cell
- cap height: The highest point, such as top of 'A'.
- x-height: Highest point of lower case such as 'e'.
- baseline: Line where you write on.
- descender: Lowest point of a character such as 'g'.
4. Avoid additional charges
It is extremely important that you write your characters to the best of your ability. Be very consistent in size and the position where it's written in the cell. Any flaws in the character in size, shape or position will simply be carried on to your font set. Do NOT use white out, this will take away from the sharpness of the character. Any extra marks or dots near the character inside the cell will carry on to your font set. Additional charges will apply if we need to re-process your template due to steps not followed on this page.
5. Scan template
Scan your completed template after you have drawn all your characters. Following are some important points to keep in mind when scanning.
- Scan at a reasonable resolution; minimum of 300 dpi
Verify that the scanner bed is clean
Put the template pages as straight as possible on the scanner bed
Scan in color (24-bit) or grayscale (8-bit), not just black and white (1-bit)
All grid lines must be clearly visible
You must save your template in one of the following formats: .gif, .jpg, .jpeg, .png, .pdf, .tif, or .tiff
6. Send template
Upload your template file to your order placed online. You must give your font a name, this name will appear as the font name in all applications, so make sure you give your font an appropriate name. Your font name can be between 4 to 30 characters and your uploaded file must not exceed 10mb. Include this name as a comment when you are uploading your file.
7. Receive your font file
Your true type font file will be placed in your order online to download. In order to use your font, you need to install it in your operating system. Installing a font makes the font available to all applications. Your font installation will vary depending upon your computer's operating system. Unfortunately, we cannot offer technical support with installing your font.